

Introduction
As you all know by now, Kubernetes is a quite popular platform for running cloud-native applications at scale. A common recommendation when doing so, is to ousource as much state as possible, because managing state in Kubernetes is not a trivial task. It can be quite hard, especially when you have a lot of attach/detach operations on your workloads. Things can go terribly wrong and – of course – your application and your users will suffer from that. A solution that becomes more and more popular in that space is Rook in combination with Ceph.
Rook is described on their homepage rook.io as follows:
Rook turns distributed storage systems into self-managing, self-scaling, self-healing storage services. It automates the tasks of a storage administrator: deployment, bootstrapping, configuration, provisioning, scaling, upgrading, migration, disaster recovery, monitoring, and resource management.
Rook is a project of the Cloud Native Computing Foundation, at the time of writing in status “incubating”.
Ceph in turn is a free-software storage platform that implements storage on a cluster, and provides interfaces for object-, block- and file-level storage. It has been around for many years in the open-source space and is a battle-proven distributed storage system. Huge storage systems have been implemented with Ceph.
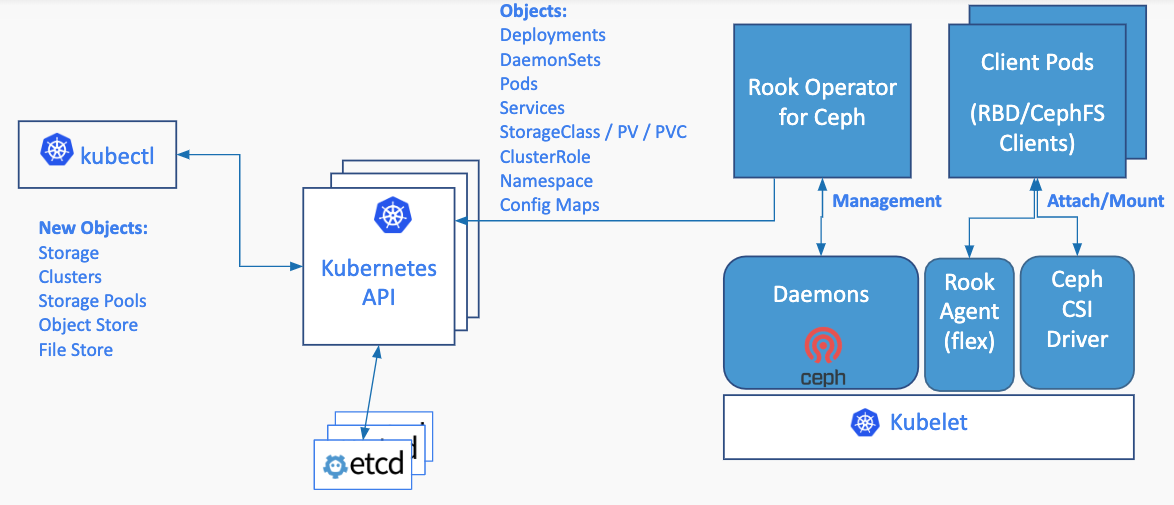
So in a nutshell, Rook enables Ceph storage systems to run on Kubernetes using Kubernetes primitives. The basic architecture for that inside a Kubernetes cluster looks as follows:
I won’t go into all of the details of Rook / Ceph, because I’d like to focus on simply running and using it on AKS in combination with PVCs. If you want to have a step-by-step introduction, there is a pretty good “Getting Started” video by Tim Serewicz on Vimeo:
First, we need a Cluster!
So, let’s start by creating a Kubernetes cluster on Azure. We will be using different nodepools for running our storage (nodepool: npstorage) and application workloads (nodepool: npstandard).
# Create a resource group

$ az group create --name rooktest-rg --location westeurope

# Create the cluster

$ az aks create \
--resource-group rooktest-rg \
--name myrooktestclstr \
--node-count 3 \
--kubernetes-version 1.14.8 \
--enable-vmss \
--nodepool-name npstandard \
--generate-ssh-keys
Add Storage Nodes
After the cluster has been created, add the npstorage nodepool:
az aks nodepool add --cluster-name myrooktestclstr \
--name npstorage --resource-group rooktest-rg \
--node-count 3 \
--node-taints storage-node=true:NoSchedule
Please be aware that we add taints to our nodes to make sure that no pods will be scheduled on this nodepool as long as we explicitly tolerate it. We want to have these nodes exclusively for storage pods!
If you need a refresh regarding the concept of “taints and tolerations”, please see the Kubernetes documentation.
So, now that we have a cluster and a dedicated nodepool for storage, we can download the cluster config.
az aks get-credentials \
--resource-group rooktest-rg \
--name myrooktestclstr
Let’s look at the nodes of our cluster:
$ kubectl get nodes

NAME                                 STATUS   ROLES   AGE    VERSION
aks-npstandard-33852324-vmss000000   Ready    agent   10m    v1.14.8
aks-npstandard-33852324-vmss000001   Ready    agent   10m    v1.14.8
aks-npstandard-33852324-vmss000002   Ready    agent   10m    v1.14.8
aks-npstorage-33852324-vmss000000    Ready    agent   2m3s   v1.14.8
aks-npstorage-33852324-vmss000001    Ready    agent   2m9s   v1.14.8
aks-npstorage-33852324-vmss000002    Ready    agent   119s   v1.14.8
So, we now have three nodes for storage and three nodes for our application workloads. From an infrastructure level, we are now ready to install Rook.
Install Rook
Let’s start installing Rook by cloning the repository from GitHub:
$ git clone https://github.com/rook/rook.git
After we have downloaded the repo to our local machine, there are three steps we need to perform to install Rook:
- Add Rook CRDs / namespace / common resources
- Add and configure the Rook operator
- Add the Rook cluster
So, switch to the /cluster/examples/kubernetes/ceph directory and follow the steps below.
1. Add Common Resources
$ kubectl apply -f common.yaml
The common.yaml contains the namespace rook-ceph, common resources (e.g. clusterroles, bindings, service accounts etc.) and some Custom Resource Definitions from Rook.
2. Add the Rook Operator
The operator is responsible for managing Rook resources and needs to be configured to run on Azure Kubernetes Service. To manage Flex Volumes, AKS uses a directory that’s different from the “default directory”. So, we need to tell the operator which directory to use on the cluster nodes.
Furthermore, we need to adjust the settings for the CSI plugin to run the corresponding daemonsets on the storage nodes (remember, we added taints to the nodes. By default, the pods of the daemonsets Rook needs to work, won’t be scheduled on our storage nodes – we need to “tolerate” this).
So, here’s the full operator.yaml file (→ important parts)
apiVersion: apps/v1
kind: Deployment
metadata:
  name: rook-ceph-operator
  namespace: rook-ceph
  labels:
    operator: rook
    storage-backend: ceph
spec:
  selector:
    matchLabels:
      app: rook-ceph-operator
  replicas: 1
  template:
    metadata:
      labels:
        app: rook-ceph-operator
    spec:
      serviceAccountName: rook-ceph-system
      containers:
      - name: rook-ceph-operator
        image: rook/ceph:master
        args: ["ceph", "operator"]
        volumeMounts:
        - mountPath: /var/lib/rook
          name: rook-config
        - mountPath: /etc/ceph
          name: default-config-dir
        env:
        - name: ROOK_CURRENT_NAMESPACE_ONLY
          value: "false"
        - name: FLEXVOLUME_DIR_PATH
          value: "/etc/kubernetes/volumeplugins"
        - name: ROOK_ALLOW_MULTIPLE_FILESYSTEMS
          value: "false"
        - name: ROOK_LOG_LEVEL
          value: "INFO"
        - name: ROOK_CEPH_STATUS_CHECK_INTERVAL
          value: "60s"
        - name: ROOK_MON_HEALTHCHECK_INTERVAL
          value: "45s"
        - name: ROOK_MON_OUT_TIMEOUT
          value: "600s"
        - name: ROOK_DISCOVER_DEVICES_INTERVAL
          value: "60m"
        - name: ROOK_HOSTPATH_REQUIRES_PRIVILEGED
          value: "false"
        - name: ROOK_ENABLE_SELINUX_RELABELING
          value: "true"
        - name: ROOK_ENABLE_FSGROUP
          value: "true"
        - name: ROOK_DISABLE_DEVICE_HOTPLUG
          value: "false"
        - name: ROOK_ENABLE_FLEX_DRIVER
          value: "false"
        # Whether to start the discovery daemon to watch for raw storage devices on nodes in the cluster.
        # This daemon does not need to run if you are only going to create your OSDs based on StorageClassDeviceSets with PVCs. --> CHANGED to false
        - name: ROOK_ENABLE_DISCOVERY_DAEMON
          value: "false"
        - name: ROOK_CSI_ENABLE_CEPHFS
          value: "true"
        - name: ROOK_CSI_ENABLE_RBD
          value: "true"
        - name: ROOK_CSI_ENABLE_GRPC_METRICS
          value: "true"
        - name: CSI_ENABLE_SNAPSHOTTER
          value: "true"
        - name: CSI_PROVISIONER_TOLERATIONS
          value: |
            - effect: NoSchedule
              key: storage-node
              operator: Exists
        - name: CSI_PLUGIN_TOLERATIONS
          value: |
            - effect: NoSchedule
              key: storage-node
              operator: Exists
        - name: NODE_NAME
          valueFrom:
            fieldRef:
              fieldPath: spec.nodeName
        - name: POD_NAME
          valueFrom:
            fieldRef:
              fieldPath: metadata.name
        - name: POD_NAMESPACE
          valueFrom:
            fieldRef:
              fieldPath: metadata.namespace
      volumes:
      - name: rook-config
        emptyDir: {}
      - name: default-config-dir
        emptyDir: {}
3. Create the Cluster
Deploying the Rook cluster is as easy as installing the Rook operator. As we are running our cluster with the Azure Kuberntes Service – a managed service – we don’t want to manually add disks to our storage nodes. Also, we don’t want to use a directory on the OS disk (which most of the examples out there will show you) as this will be deleted when the node will be upgraded to a new Kubernetes version.
In this sample, we want to leverage Persistent Volumes / Persistent Volume Claims that will be used to request Azure Managed Disks which will in turn be dynamically attached to our storage nodes. Thankfully, when we installed our cluster, a corresponding storage class for using Premium SSDs from Azure was also created.
$ kubectl get storageclass

NAME                PROVISIONER                AGE
default (default)   kubernetes.io/azure-disk   15m
managed-premium     kubernetes.io/azure-disk   15m
Now, let’s create the Rook Cluster. Again, we need to adjust the tolerations and add a node affinity that our OSDs will be scheduled on the storage nodes (→ important parts):
apiVersion: ceph.rook.io/v1
kind: CephCluster
metadata:
  name: rook-ceph
  namespace: rook-ceph
spec:
  dataDirHostPath: /var/lib/rook
  mon:
    count: 3
    allowMultiplePerNode: false
    volumeClaimTemplate:
      spec:
        storageClassName: managed-premium
        resources:
          requests:
            storage: 10Gi
  cephVersion:
    image: ceph/ceph:v14.2.4-20190917
    allowUnsupported: false
  dashboard:
    enabled: true
    ssl: true
  network:
    hostNetwork: false
  storage:
    storageClassDeviceSets:
    - name: set1
      # The number of OSDs to create from this device set
      count: 4
      # IMPORTANT: If volumes specified by the storageClassName are not portable across nodes
      # this needs to be set to false. For example, if using the local storage provisioner
      # this should be false.
      portable: true
      # Since the OSDs could end up on any node, an effort needs to be made to spread the OSDs
      # across nodes as much as possible. Unfortunately the pod anti-affinity breaks down
      # as soon as you have more than one OSD per node. If you have more OSDs than nodes, K8s may
      # choose to schedule many of them on the same node. What we need is the Pod Topology
      # Spread Constraints, which is alpha in K8s 1.16. This means that a feature gate must be
      # enabled for this feature, and Rook also still needs to add support for this feature.
      # Another approach for a small number of OSDs is to create a separate device set for each
      # zone (or other set of nodes with a common label) so that the OSDs will end up on different
      # nodes. This would require adding nodeAffinity to the placement here.
      placement:
        tolerations:
        - key: storage-node
          operator: Exists
        nodeAffinity:
          requiredDuringSchedulingIgnoredDuringExecution:
            nodeSelectorTerms:
            - matchExpressions:
              - key: agentpool
                operator: In
                values:
                - npstorage
        podAntiAffinity:
          preferredDuringSchedulingIgnoredDuringExecution:
          - weight: 100
            podAffinityTerm:
              labelSelector:
                matchExpressions:
                - key: app
                  operator: In
                  values:
                  - rook-ceph-osd
                - key: app
                  operator: In
                  values:
                  - rook-ceph-osd-prepare
              topologyKey: kubernetes.io/hostname
      resources:
        limits:
          cpu: "500m"
          memory: "4Gi"
        requests:
          cpu: "500m"
          memory: "2Gi"
      volumeClaimTemplates:
      - metadata:
          name: data
        spec:
          resources:
            requests:
              storage: 100Gi
          storageClassName: managed-premium
          volumeMode: Block
          accessModes:
            - ReadWriteOnce
  disruptionManagement:
    managePodBudgets: false
    osdMaintenanceTimeout: 30
    manageMachineDisruptionBudgets: false
    machineDisruptionBudgetNamespace: openshift-machine-api
So, after a few minutes, you will see some pods running in the rook-ceph namespace. Make sure, that the OSD pods a running, before continuing with configuring the storage pool.
$ kubectl get pods -n rook-ceph
NAME                                                              READY   STATUS      RESTARTS   AGE
csi-cephfsplugin-4qxsv                                            3/3     Running     0          28m
csi-cephfsplugin-d2klt                                            3/3     Running     0          28m
csi-cephfsplugin-jps5r                                            3/3     Running     0          28m
csi-cephfsplugin-kzgrt                                            3/3     Running     0          28m
csi-cephfsplugin-provisioner-dd9775cd6-nsn8q                      4/4     Running     0          28m
csi-cephfsplugin-provisioner-dd9775cd6-tj826                      4/4     Running     0          28m
csi-cephfsplugin-rt6x2                                            3/3     Running     0          28m
csi-cephfsplugin-tdhg6                                            3/3     Running     0          28m
csi-rbdplugin-6jkx5                                               3/3     Running     0          28m
csi-rbdplugin-clfbj                                               3/3     Running     0          28m
csi-rbdplugin-dxt74                                               3/3     Running     0          28m
csi-rbdplugin-gspqc                                               3/3     Running     0          28m
csi-rbdplugin-pfrm4                                               3/3     Running     0          28m
csi-rbdplugin-provisioner-6dfd6db488-2mrbv                        5/5     Running     0          28m
csi-rbdplugin-provisioner-6dfd6db488-2v76h                        5/5     Running     0          28m
csi-rbdplugin-qfndk                                               3/3     Running     0          28m
rook-ceph-crashcollector-aks-npstandard-33852324-vmss00000c8gdp   1/1     Running     0          16m
rook-ceph-crashcollector-aks-npstandard-33852324-vmss00000tfk2s   1/1     Running     0          13m
rook-ceph-crashcollector-aks-npstandard-33852324-vmss00000xfnhx   1/1     Running     0          13m
rook-ceph-crashcollector-aks-npstorage-33852324-vmss000001c6cbd   1/1     Running     0          5m31s
rook-ceph-crashcollector-aks-npstorage-33852324-vmss000002t6sgq   1/1     Running     0          2m48s
rook-ceph-mgr-a-5fb458578-s2lgc                                   1/1     Running     0          15m
rook-ceph-mon-a-7f9fc6f497-mm54j                                  1/1     Running     0          26m
rook-ceph-mon-b-5dc55c8668-mb976                                  1/1     Running     0          24m
rook-ceph-mon-d-b7959cf76-txxdt                                   1/1     Running     0          16m
rook-ceph-operator-5cbdd65df7-htlm7                               1/1     Running     0          31m
rook-ceph-osd-0-dd74f9b46-5z2t6                                   1/1     Running     0          13m
rook-ceph-osd-1-5bcbb6d947-pm5xh                                  1/1     Running     0          13m
rook-ceph-osd-2-9599bd965-hprb5                                   1/1     Running     0          5m31s
rook-ceph-osd-3-557879bf79-8wbjd                                  1/1     Running     0          2m48s
rook-ceph-osd-prepare-set1-0-data-sv78n-v969p                     0/1     Completed   0          15m
rook-ceph-osd-prepare-set1-1-data-r6d46-t2c4q                     0/1     Completed   0          15m
rook-ceph-osd-prepare-set1-2-data-fl8zq-rrl4r                     0/1     Completed   0          15m
rook-ceph-osd-prepare-set1-3-data-qrrvf-jjv5b                     0/1     Completed   0          15m
Configuring Storage
Before Rook can provision persistent volumes, either a filesystem or a storage pool should be configured. In our example, a Ceph Block Pool is used:
apiVersion: ceph.rook.io/v1
kind: CephBlockPool
metadata:
  name: replicapool
  namespace: rook-ceph
spec:
  failureDomain: host
  replicated:
    size: 3
Next, we also need a storage class that will be using the Rook cluster / storage pool. In our example, we will not be using Flex Volume (which will be deprecated in furture versions of Rook/Ceph), instead we use Container Storage Interface.
apiVersion: storage.k8s.io/v1
kind: StorageClass
metadata:
   name: rook-ceph-block
provisioner: rook-ceph.rbd.csi.ceph.com
parameters:
    clusterID: rook-ceph
    pool: replicapool
    imageFormat: "2"
    imageFeatures: layering
    csi.storage.k8s.io/provisioner-secret-name: rook-csi-rbd-provisioner
    csi.storage.k8s.io/provisioner-secret-namespace: rook-ceph
    csi.storage.k8s.io/node-stage-secret-name: rook-csi-rbd-node
    csi.storage.k8s.io/node-stage-secret-namespace: rook-ceph
    csi.storage.k8s.io/fstype: xfs
reclaimPolicy: Delete
Test
Now, let’s have a look at the dashboard which was also installed when we created the Rook cluster. Therefore, we are port-forwarding the dashboard service to our local machine. The service itself is secured by username/password. The default username is admin and the password is stored in a K8s secret. To get the password, simply run the following command.
$ kubectl -n rook-ceph get secret rook-ceph-dashboard-password \
    -o jsonpath="{['data']['password']}" | base64 --decode && echo
# copy the password

$ kubectl port-forward svc/rook-ceph-mgr-dashboard 8443:8443 \
    -n rook-ceph
Now access the dasboard by heading to https://localhost:8443/#/dashboard
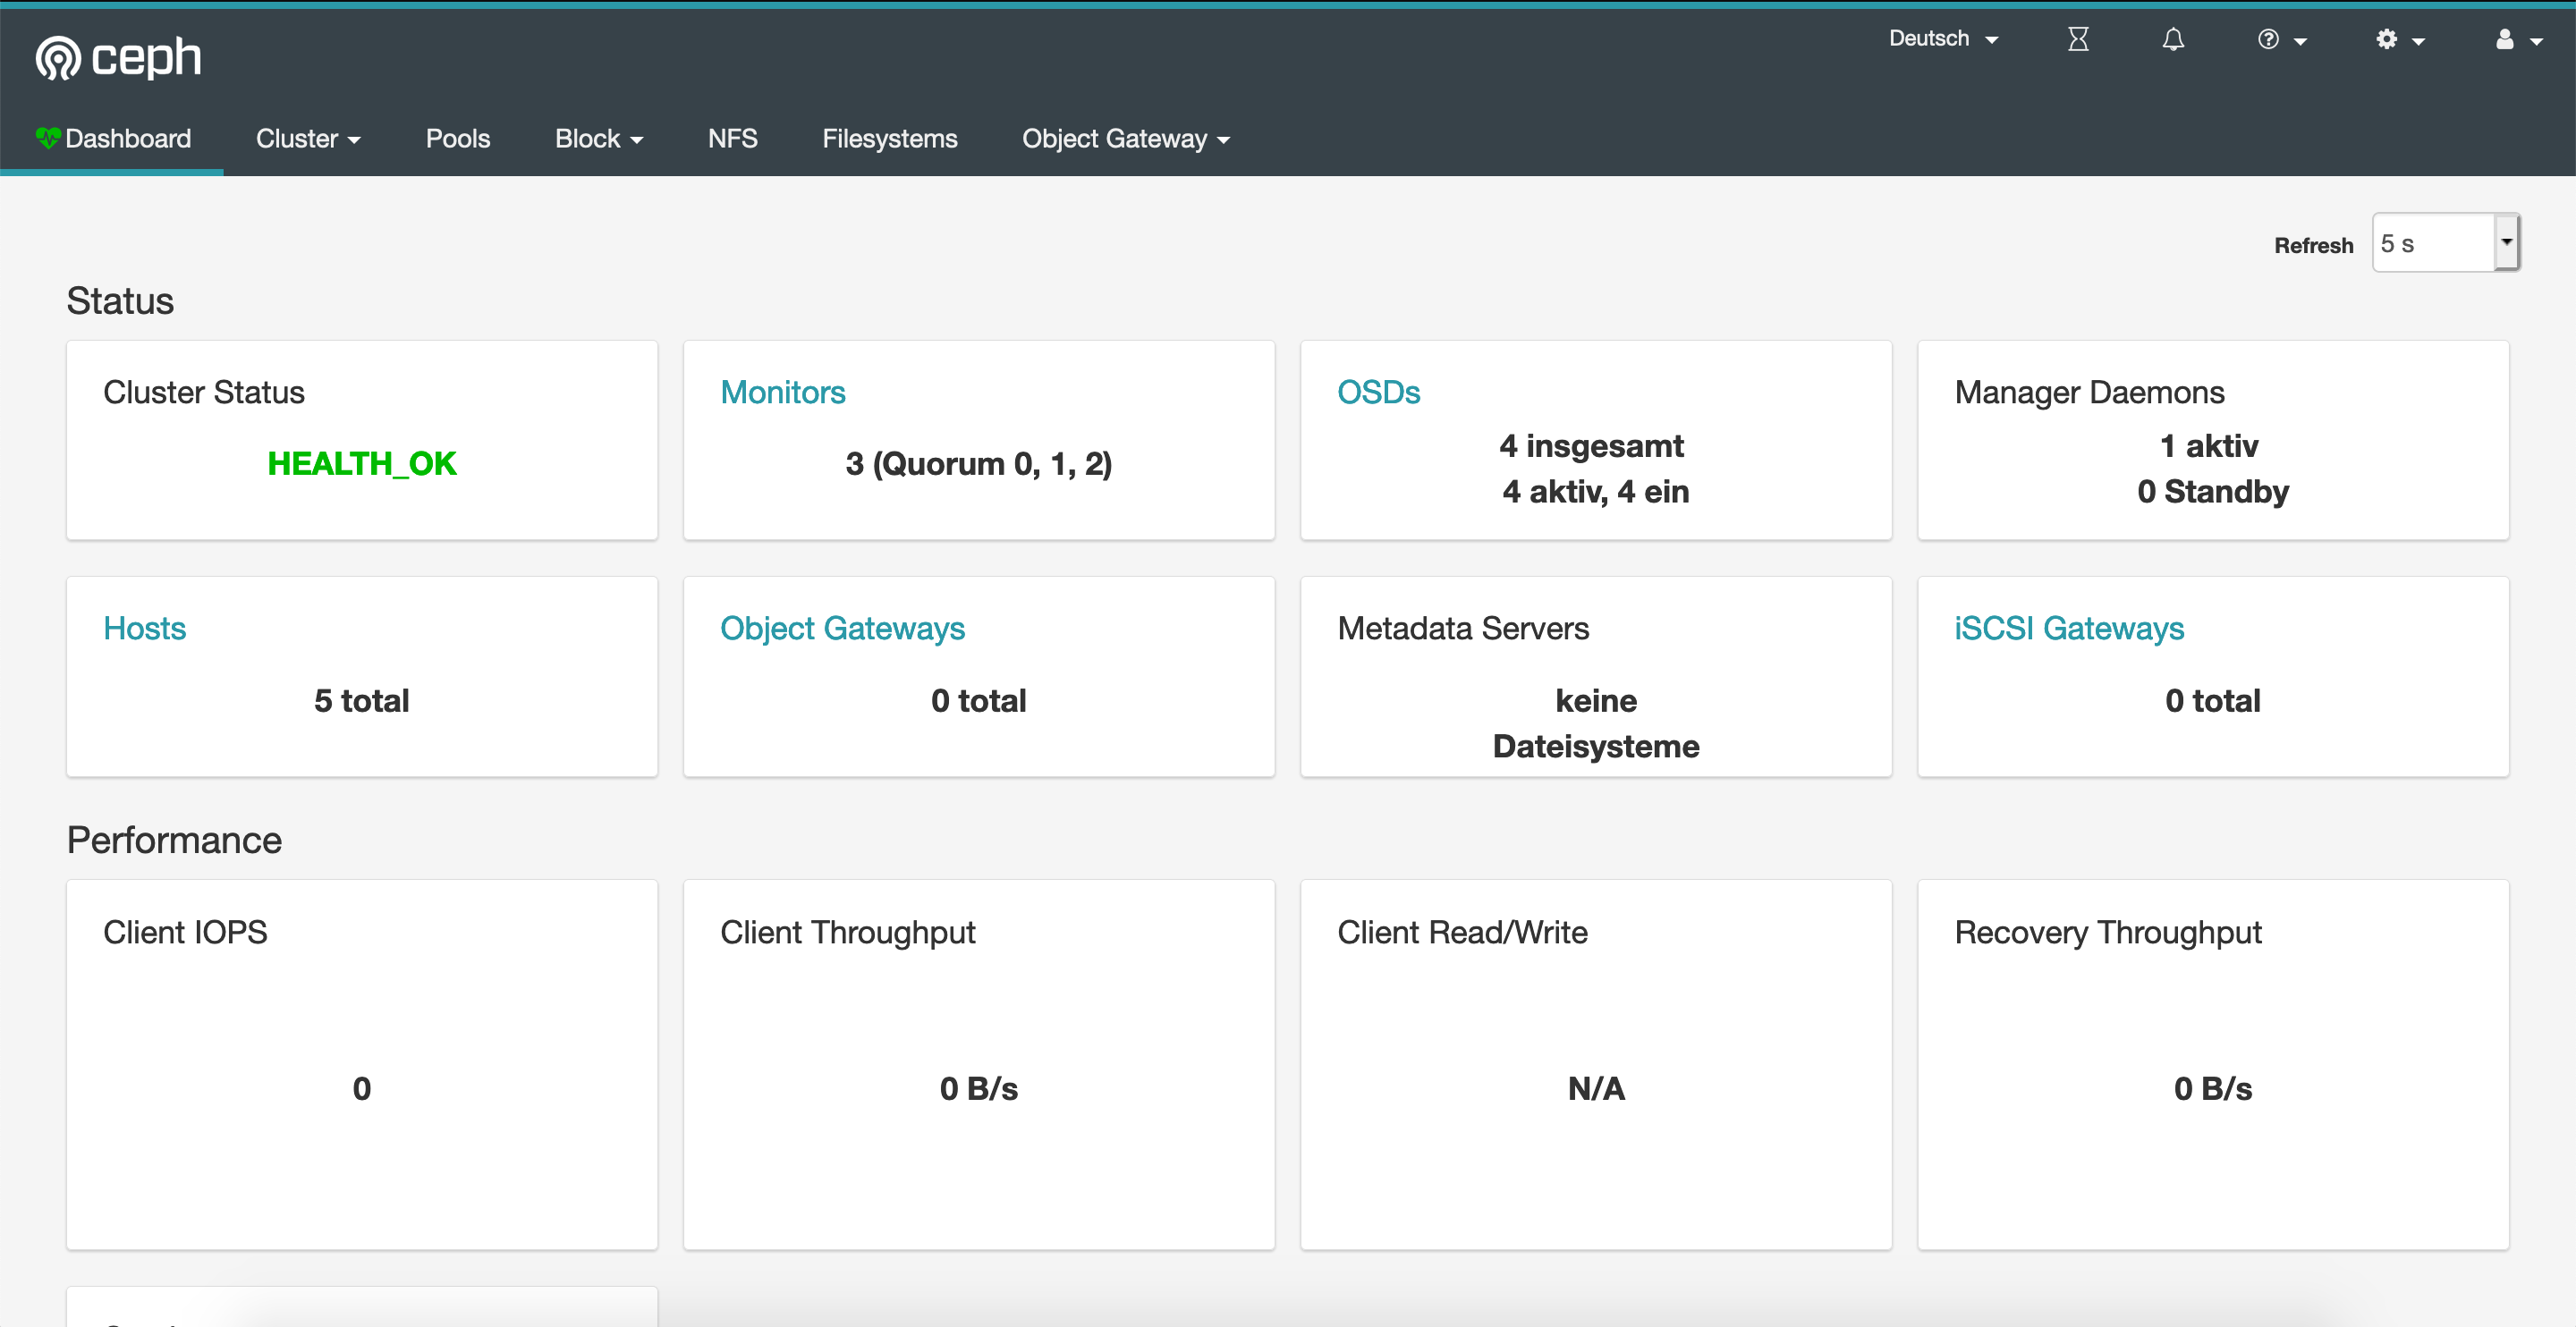
As you can see, everything looks healthy. Now let’s create a pod that’s using a newly created PVC leveraging that Ceph storage class.
PVC
apiVersion: v1
kind: PersistentVolumeClaim
metadata:
  name: ceph-pv-claim
spec:
  storageClassName: rook-ceph-block
  accessModes:
    - ReadWriteOnce
  resources:
    requests:
      storage: 10Gi
Pod
apiVersion: v1
kind: Pod
metadata:
  name: ceph-pv-pod
spec:
  volumes:
    - name: ceph-pv-claim
      persistentVolumeClaim:
        claimName: ceph-pv-claim
  containers:
    - name: task-pv-container
      image: nginx
      ports:
        - containerPort: 80
          name: "http-server"
      volumeMounts:
        - mountPath: "/usr/share/nginx/html"
          name: ceph-pv-claim
As a result, you will now have an NGINX pod running in your Kuberntes cluster with a PV attached/mounted under /usr/share/nginx/html.
Wrap Up
So…what exactly did we achieve with this solution now? We have created a Ceph storage cluster on an AKS that uses PVCs to manage storage. Okay, so what? Well, the usage of volume mounts in your deployments with Ceph is now super-fast and rock-solid, because we do not have to attach physical disks to our worker nodes anymore. We just use the ones we have created during Rook cluster provisioning (remember these four 100GB disks?)! We minimized the amount of “physical attach/detach” actions on our nodes. That’s why now, you won’t see these popular “WaitForAttach”- or “Can not find LUN for disk”-errors anymore.
Hope this helps someone out there! Have fun with it.
Update: Benchmarks
Short update on this. Today, I did some benchmarking with dbench (https://github.com/leeliu/dbench/) comparing Rook Ceph and “plain” PVCs with the same Azure Premium SSD disks (default AKS StorageClass managed-premium, VM types: Standard_DS2_v2). Here are the results…as you can see, it depends on your workload…so, judge by yourself.
Rook Ceph
==================
= Dbench Summary =
==================
Random Read/Write IOPS: 10.6k/571. BW: 107MiB/s / 21.2MiB/s
Average Latency (usec) Read/Write: 715.53/31.70
Sequential Read/Write: 100MiB/s / 43.2MiB/s
Mixed Random Read/Write IOPS: 1651/547
PVC with Azure Premium SSD
100GB disk used to have a fair comparison
==================
= Dbench Summary =
==================
Random Read/Write IOPS: 8155/505. BW: 63.7MiB/s / 63.9MiB/s
Average Latency (usec) Read/Write: 505.73/
Sequential Read/Write: 63.6MiB/s / 65.3MiB/s
Mixed Random Read/Write IOPS: 1517/505

Great write up on Rook and Azure! Would be interesting to see Rook EdgeFS running on Azure as well. Any plans for this?
LikeLiked by 1 person
Thank you! And yes…already had a first look at it yesterday. Need to check if AKS nodes do have the iSCSI drivers installed out-of-the-box. Otherwise it would „break“ the „managed Kubernetes“-story. Anyway, I‘ll try and if I get it to work, you‘ll see a new post.
LikeLike
Hmm what happens with the dataDirHostPath /var/lib/rook when kubernetes is upgraded to a new Kubernetes version? Wouldnt the storage nodes deleted/recycled/recreated and the config and data in that drectory gone?
Would rook end up in an inconsistent state? Thanks
LikeLike
Hmm what happens with the dataDirHostPath /var/lib/rook when kubernetes is upgraded to a new Kubernetes version? Wouldnt the storage nodes deleted/recycled/recreated and the config and data in that drectory gone?
Would rook end up in an inconsistent state? Thanks
LikeLike
Hi! I’m far from being an expert in Rook so I can’t give you any insights regarding the process…but I just reimplemented the sample from the blog post and did an upgrade of the cluster. Seems like Rook is taking care of initializing the directory on upgraded nodes based on the existing replicas within the cluster. Everything worked as expected.
LikeLike
BTW, I used the current version of Rook and the upgrade was done from 1.16.3 to 1.17.7.
LikeLike
I have done till creating cluster. Now my requirement is to provision NFS on top of this ceph cluster. How can I do that?
LikeLike
Please follow the official documentation: https://rook.io/docs/rook/v1.5/ceph-nfs-crd.html
LikeLike