

Lately, I have been working a lot with Kubernetes as one (of many) solutions to run Docker containers in the cloud. Microsoft therefore offers Azure Container Service (ACS), a service to create and (partly) manage a Kubernetes cluster on Azure.
You normally would deploy such a cluster via the Azure Portal or e.g. via the Azure Command Line Interface. Here is a sample command:
az acs create --orchestrator-type kubernetes
  --resource-group k8s-rg --name myk8scluster --generate-ssh-keys
Unfortunately, you cannot customize all the properties of the Kubernetes deployment with this approach, e.g. if you want to place the cluster in an existing Azure Virtual Network (VNET) or if you want to run multiple node types within the cluster to be able to run Linux and Windows based images/pods in parallel.
To achieve this, you must use the ACS engine which is a kind of “translator” between cluster configurations (which are provided in JSON format) and Azure Resource Manager templates.
ACS Engine
The ACS engine provides a convenient way to generate an ARM template that creates a Kubernetes cluster for you in Azure. The nice thing about it is, that you can influence a lot more properties of the cluster than you can do via the portal or CLI. But more on this later…
If you execute the ACS engine, the resulting template created consists of all the resources, you need to run a cluster in Azure, e.g.:
- Availability Sets for Master and Agent nodes
- VMs / VM extensions
- NICs / VNET configurations
- Load Balancer
- etc.
You can deploy the ARM template as you would deploy any other template to Azure by running a Powershell or CLI command, even via the portal.
But let’s get to our sample, creating a hybrid Windows/Linux cluster…
Hybrid Cluster With ACS Engine
We will start by creating a cluster definition file…
| { | |
| "apiVersion": "vlabs", | |
| "properties": { | |
| "orchestratorProfile": { | |
| "orchestratorType": "Kubernetes", | |
| "orchestratorRelease": "1.8" | |
| }, | |
| "masterProfile": { | |
| "count": 1, | |
| "dnsPrefix": "[CLUSTERNAME]", | |
| "vmSize": "Standard_D2_v2" | |
| }, | |
| "agentPoolProfiles": [ | |
| { | |
| "name": "linuxpool", | |
| "count": 3, | |
| "vmSize": "Standard_D2_v2", | |
| "availabilityProfile": "AvailabilitySet" | |
| }, | |
| { | |
| "name": "winpool", | |
| "count": 2, | |
| "vmSize": "Standard_D2_v2", | |
| "availabilityProfile": "AvailabilitySet", | |
| "osType": "Windows" | |
| } | |
| ], | |
| "windowsProfile": { | |
| "adminUsername": "azureuser", | |
| "adminPassword": "[WINDOWS_ADMIN_PASSWORD]" | |
| }, | |
| "linuxProfile": { | |
| "adminUsername": "azureuser", | |
| "ssh": { | |
| "publicKeys": [ | |
| { | |
| "keyData": "[SSH_PUBLIC_KEY]" | |
| } | |
| ] | |
| } | |
| }, | |
| "servicePrincipalProfile": { | |
| "clientId": "[APP_ID]", | |
| "secret": "[PASSWORD]" | |
| } | |
| } | |
| } | |
| export EXPECTED_NODE_COUNT=6 |
Some details on that:
- First of all, we create the cluster configuration, setting the Kubernetes version to “1.8” (starting line 4)
- the profile of the master node is set, giving it a name and a VM type “Standard_D2_v2” (beginning line 8).
- agent profiles are defined, setting up two profiles. One for Linux nodes, the other one for Windows nodes…also setting the VM size to “Standard_D2_v2” (lines 13 to 27)
- next, the two profiles are configured, each with the corresponding access information (user name or ssh key), lines 28 to 41
- the last step is to set the service principal (application id and password, lines 42 to 45), which is needed by Kubernetes to interact with Azure. E.g. when you define a service of type “LoadBalancer”, K8s reaches out to Azure to create an external IP at the Azure Load Balancer
- the .env file has to be placed in the same folder as the JSON file
In case a SSH key has to be created, you can do this on Windows via PuttyGen or on Linux/Mac via ssh directly. The value of the public key must be specified in the definition file (keyData, line 37).
If no service principal already exists, you can create it using the following command:
az ad sp create-for-rbac
  --role Contributor --scopes="/subscriptions/[YOUR_SUBSCRIPTION_ID]"
The values from “appId” and “password” must be stored in the corresponding properties of the cluster configuration (lines 43 and 44).
Generate The ARM Template
In order to create the ARM template from the cluster configuration, we first need the ACS-engine binary. You can download it from here. Unzip the contents and place the destination folder into the PATH environment variable, to be able to run it from anywhere on your machine.
Next, run the ACS engine with your configuration…
acs-engine generate .\k8s-hybrid.json
The ACS engine takes the JSON file and generates an _output directory with all the necessary artifacts (among other things, a rather large ARM template + parameters-file) to deploy the K8s cluster to Azure. Here’s a visual representation of the ARM template:

Next, you simply deploy the template, as you would do it with other ARM templates. First, create a Azure Resource Group:
az group create -n k8scluster-rg -l westeurope
Afterwards, switch to the _output/[CLUSTERNAME] folder and deploy the template:
az group deployment create -g k8scluster-rg
  --template-file .\azuredeploy.json
  --parameters .\azuredeploy.parameters.json
After some time, the command returns, telling you that the cluster has been created successfully.
Connect To The Cluster
After creating the cluster, we want to connect to it via kubectl. Therefore we need the configuration of the cluster, which we have to copy by scp or pscp (from Putty) from the master node. To do this, execute this command (I’m on Windows, so I use pscp):
pscp -i [PATH_TO_PRIVATE_SSHKEY_FILE]
  azureuser@[FQDN_OF_MASTER_NODE]:.kube/config .
If you want to, set the config file you just downloaded as the default file (environment variable KUBECONFIG), otherwise use the config by passing
--kubeconfig=".\config"
to each kubectl command.
So, let’s try to get the nodes of our cluster:
kubectl --kubeconfig=".\config" get nodes
Result:
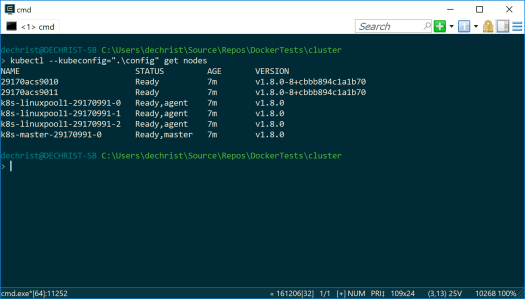
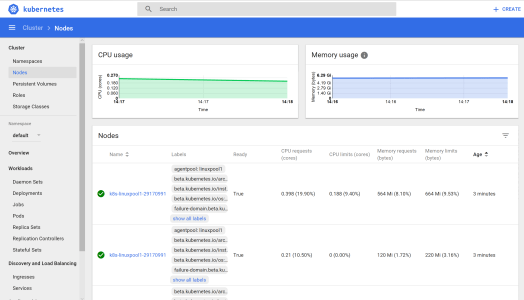
That looks pretty good! Now let’s connect to the dashboard via…
kubectl --kubeconfig=".\config" proxy
…then open up a browser window and point to:
http://localhost:8001/api/v1/proxy/namespaces/kube-system/services/kubernetes-dashboard/
Now head over to the “Nodes” view and click on one of the “*acs90*” nodes:
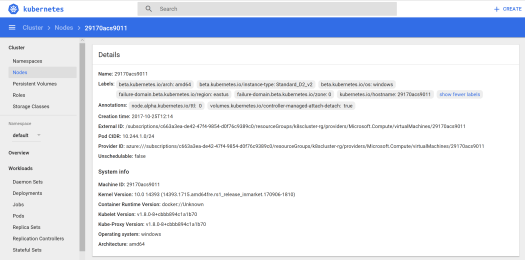
As you can see, this node runs Windows (one of the node labels is “beta.kubernetes.io/os: windows“)…a Windows version of course, that can run Windows based containers!
Deploy Some Windows And Linux Containers
To test our cluster, we deploy the following template to Kubernetes:
| apiVersion: extensions/v1beta1 | |
| kind: Deployment | |
| metadata: | |
| name: webdeployment | |
| spec: | |
| replicas: 3 | |
| strategy: | |
| type: RollingUpdate | |
| rollingUpdate: | |
| maxSurge: 1 | |
| maxUnavailable: 1 | |
| minReadySeconds: 3 | |
| template: | |
| metadata: | |
| labels: | |
| app: "dockertest" | |
| tier: "web" | |
| spec: | |
| containers: | |
| - name: nginx | |
| image: nginx:latest | |
| imagePullPolicy: Always | |
| ports: | |
| - containerPort: 80 | |
| nodeSelector: | |
| beta.kubernetes.io/os: linux | |
| --- | |
| apiVersion: extensions/v1beta1 | |
| kind: Deployment | |
| metadata: | |
| name: webiisdeployment | |
| spec: | |
| replicas: 3 | |
| strategy: | |
| type: RollingUpdate | |
| rollingUpdate: | |
| maxSurge: 1 | |
| maxUnavailable: 1 | |
| minReadySeconds: 3 | |
| template: | |
| metadata: | |
| labels: | |
| app: "dockertest" | |
| tier: "webiis" | |
| spec: | |
| containers: | |
| - name: dockerwebiis | |
| image: microsoft/iis | |
| imagePullPolicy: Always | |
| ports: | |
| - containerPort: 80 | |
| nodeSelector: | |
| beta.kubernetes.io/os: windows | |
| --- | |
| apiVersion: v1 | |
| kind: Service | |
| metadata: | |
| name: webservice | |
| labels: | |
| app: "dockertest" | |
| tier: "web" | |
| spec: | |
| selector: | |
| app: "dockertest" | |
| tier: "web" | |
| ports: | |
| - protocol: TCP | |
| port: 80 | |
| targetPort: 80 | |
| type: LoadBalancer | |
| --- | |
| apiVersion: v1 | |
| kind: Service | |
| metadata: | |
| name: webiisservice | |
| labels: | |
| app: "dockertest" | |
| tier: "webiis" | |
| spec: | |
| selector: | |
| app: "dockertest" | |
| tier: "webiis" | |
| ports: | |
| - protocol: TCP | |
| port: 80 | |
| targetPort: 80 | |
| type: LoadBalancer |
What it will create:
- 3 pods on Linux nodes, based on the current nginx image
- 3 pods on Windows nodes, based on the Windows Server Core / IIS image
- An external service for the nginx pods
- An external service for the IIS pods
The important part of the deployment file is the node selection for the pods/containers. In lines 25/26, the template defines to select Linux-based nodes to deploy the nginx containers:
nodeSelector:
        beta.kubernetes.io/os: linux
The same is done for the IIS deployment (lines 52/53):
nodeSelector:
        beta.kubernetes.io/os: windows
These properties tell the Kubernetes cluster to create the nginx pods only on Linux and the IIS pods on Windows nodes, magic!
After some time (give it a few “seconds”, the image of the IIS pods is about 5 GB!), you will be able to query the running pods and the services:
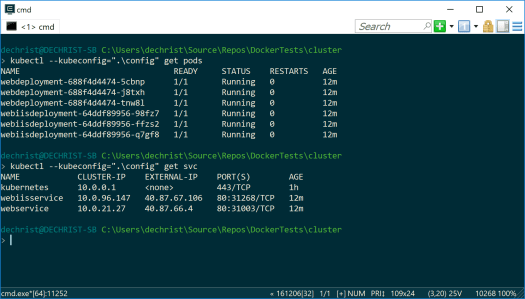
Et voilà, we are able to connect to the services via a browser…
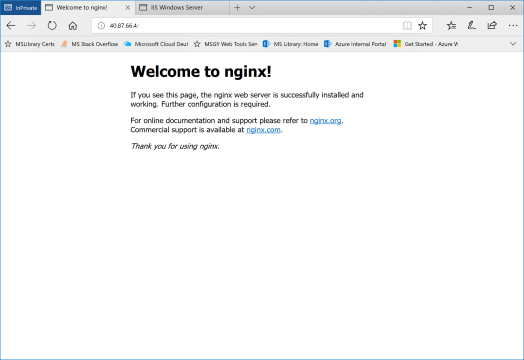
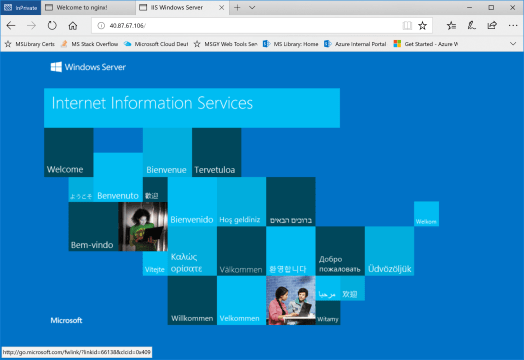
That’s what we wanted to achieve…Linux and Windows containers managed by the same cluster! 🙂
Wrap Up
I hope you could see, how easy it is to deploy a Kubernetes cluster to Azure. In this example, I only showed how to create a hybrid cluster, to be able to run Linux and Windows based containers/pods in parallel. Nevertheless, on the ACS Engine Github repository (where this sample is basically from) you can find many other examples, e.g. to place the cluster in an existing VNET, attach disks to nodes, create a Swarm cluster etc. Check it out, play with ACS…and have fun! 🙂

when I run “az deploy….” in order to deploy all the resources via the ARM template in azure,I get an error like this “The template deployment ‘azuredeploy’ is not valid according to the validation procedure. The tracking id is ’05ae1c60-b2
df-43b7-99f3-906a60bbba43′. See inner errors for details. Please see https://aka.ms/arm-deploy for usage details.”
Can anyone help me on this?
LikeLike
You mean, you get an error when you want to deploy the generated template (via acs-engine)? Did you adjust the template manually? If not, try to get the latest version of acs-engine, recreate the template and check, that you have entered valid parameters in the json files you use with acs-engine. If the error persists, try and get the latest version of the template from https://github.com/Azure/acs-engine/tree/master/examples/windows.
If all this does not resolve the issue, please open a ticket on GitHub at https://github.com/Azure/acs-engine.
Cheers,
Christian
LikeLike
Hi Christian,This is very helpful post for me.Only concern is that, I want to create the Hybrid(Windows + Linux) Cluster in Azure using AKS. Is there any way to do this ? Thanks in advance.
LikeLike
Hi Roushan,
creating a hybrid cluster is currently not supported in AKS. But multiple agent pools is a planned feature.
Regards,
Christian
LikeLike