

In case you missed it, the Azure Managed Kubernetes service (AKS) has been released today (June, 13th 2018, hoooooray 🙂 see the official announcement from Brendan Burns here) and it is now possible to run production workloads on a fully Microsoft-managed Kubernetes cluster in the Azure cloud. “Fully managed” means, that the K8s control plane and the worker nodes (infrastructure) are managed by Microsoft (API server, Docker runtime, scheduler, etcd server…), security patches are applied on a dialy basis to the underlying OS, you get Azure Active Directory integration (currently in preview) etc. And what’s really nice: you only pay for the worker nodes, the control plane is completely free!
The integration of Kubernetes into the Azure infrastructure part is really impressive, but when it comes to service integration and provisioning on the cloud platform there is still room for improvement…but it’s on its way! The Open Service Broker for Azure (update: Version 1.0 reached) closes the gap between Kubernetes workloads that require certain Azure services to run and the provisioning part of these services as it makes it possible e.g. to create a SQL server instance in Azure via a Kubernetes “YAML”-file during deployment of other Kubernetes objects on the fly. Sounds good? Let’s see, how this works.
Creating a Kubernetes Demo Cluster
First of all, we need a Kubernetes cluster to be able to test the Open Service Broker for Azure – we are going to use Azure CLI, therefore please make sure you have installed the latest version of it.
Okay, so let’s create an Azure resource group where we can deploy the AKS cluster to afterwards:
// resource group
az group create --name osba-demo-rg --location westeurope

// AKS cluster - version must be above 1.9 (!)
az aks create
        --resource-group osba-demo-rg
        --name osba-k8sdemo-cluster
        --generate-ssh-keys
        --kubernetes-version 1.9.6
When the deployment of the cluster has finished, download the corresponding kubeconfig file:
az aks get-credentials
        --resource-group osba-demo-rg
        --name osba-k8sdemo-cluster
Now we are ready to use kubectl to work with the newly created cluster. Test the connection by querying the available worker nodes of the cluster:
kubectl get nodes
You should see something like this:

Before we can install the Open Service Broker, we also need a service principal in Azure that is able to interact with the Azure Resource Manager and create resources on behalf of us (think of it as a “service account” in Linux / Windows).
az ad sp create-for-rbac --name osba-demo-principal -o table
Important: Remember “Tenant”, “Application ID” and “Password” for you will need these values when installing the OSBA now.
Installing OSBA
Cluster Installation
We are using Helm to install OSBA on our cluster, so we first need to prepare your local machine for Helm (FYI: your AKS cluster is by default ready to use Helm, so there’s no need to install anything on it – anyway, you need to install the Helm client on your workstation):
helm init
Next, we need to deploy the Service Catalog on the cluster:
helm repo add svc-cat https://svc-catalog-charts.storage.googleapis.com

helm install svc-cat/catalog --name catalog --namespace catalog \
   --set rbacEnable=false \
   --set apiserver.storage.etcd.persistence.enabled=true
Please note: if you have installed your cluster with the option “RBAC-enabled” (which is standard in the meantime for AKS deployments – unless you disable it), you’ll have to set rbacEnable=true! The service catalog apiserver container will fail to start otherwise.
Now we are ready to deploy OSBA to the cluster:
// add the Azure charts repository

helm repo add azure https://kubernetescharts.blob.core.windows.net/azure


// finally, add the service broker for Azure

helm install azure/open-service-broker-azure --name osba --namespace osba `
  --set azure.subscriptionId=<Your Subscription ID>  `
  --set azure.tenantId=<Tenant> `
  --set azure.clientId=<Service Principal Application ID> `
  --set azure.clientSecret=<Service Principal Password>
Info: In case you don’t know your Azure subscription Id, run…
az account show
…and use the value of property “id”.
You can check the status of the deployments (catalog & service broker) by querying the running pods in the namespaces catalog and osba.

Service Catalog Client Tools
Service Catalog comes with its own command line interface. So you need to install it on your machine (installation instructions).
Using the OSBA for Service Provisioning
Now, we are prepared to provision / create so-called “ServiceInstances” (Azure resources) and “bind” them via “ServiceBindings” in order to be able to use them as resources/endpoints/services etc. in our pods.
In the current example, we want to provision an Azure SQL DB. So first of all, we need to create a service intance of the database. Therefore, use the following YAML definition:
| apiVersion: servicecatalog.k8s.io/v1beta1 | |
| kind: ServiceInstance | |
| metadata: | |
| name: demosqlinstance | |
| namespace: default | |
| spec: | |
| clusterServiceClassExternalName: azure-sql-12-0 | |
| clusterServicePlanExternalName: standard | |
| parameters: | |
| location: westeurope | |
| resourceGroup: osbademo-resources-rg | |
| firewallRules: | |
| - startIPAddress: "0.0.0.0" | |
| endIPAddress: "255.255.255.255" | |
| name: "AllowAll" | |
| dtus: 10 |
As you can see, you, there are some values, you have to provide to OSBA:
- clusterServiceClassExternalName – in our case, we want to create an Azure SQL DB. You can query the available service classes by using the following command: svcat get classes. We will be using azure-sql-12-0.
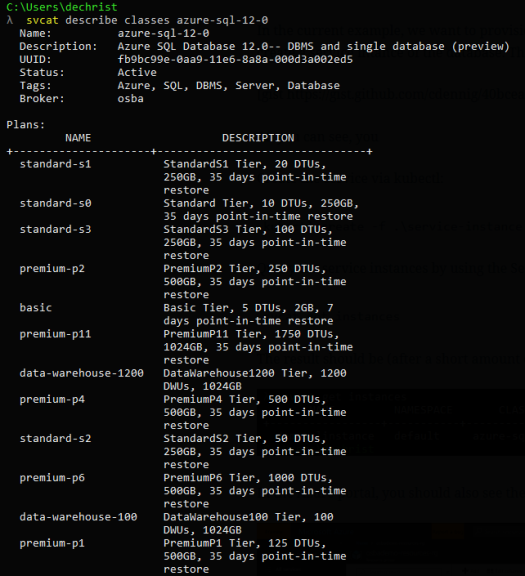
- clusterServicePlanExternalName – the service plan name which represents the service tier in Azure. Use svcat describe classes azure-sql-12-0 to show the available service plans for class azure-sql-12-0. We will be using standard-s1.
- resourceGroup – the Azure resource group for the server and database

Now, create the service via kubectl:
kubectl create -f .\service-instance.yaml
Query the service instances by using the Service Catalog CLI:
svcat get instances
The result should be (after a short amount of time) something like that:

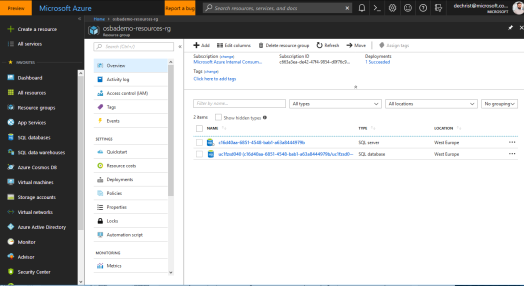
In the Azure portal, you should also see these newly created resources:
Now that we have created the service instance, let’s bind the instance, in order to be able to use it. Here’s the YAML file for it:
| apiVersion: servicecatalog.k8s.io/v1beta1 | |
| kind: ServiceBinding | |
| metadata: | |
| name: demosql-binding | |
| namespace: default | |
| spec: | |
| instanceRef: | |
| name: demosqlinstance | |
| secretName: demo-osba-sql-secret |
kubectl create -f service-binding.yaml
As seen with the service instance, the service binding also needs some parameters in order to work. Of course, the binding needs a reference to the service instance, it wants to use (instanceRef). The more interesting property is secretName. While creating the binding, the service broker also creates a secret in the current namespace, where important values ( like passwords, server name, database name, URIs etc.) are added. You can reference the secret / values afterwards in your K8s deployments and add them e.g. as environment variables to your pods.
Now let’s see, if the binding has been created via svcat:

That look’s good. Over to the Kubernetes dashboard, to see, if the secret has been created in the default namespace.

It seems like everything was “bound” for usage as expected and we are now ready to use the Azure SQL DB in our containers/pods!
Wrap Up
As you have seen in this example, with the Open Service Broker for Azure it is very easy to create Azure resources via Kubernetes object definitions. You simply need to install OSBA to your cluster with Helm! Afterwards, you can create and bind Azure services like Azure SQL DB. If you are curious what resource providers are supported, there are currently three services, that are available:
- Azure Database for MySQL / OSBA definition
- Azure Database for PostgreSQL / OSBA definition
- Azure SQL Database / OSBA definition
…and some experimental services:
- Azure CosmosDB
- Azure KeyVault
- Azure Redis Cache
- Azure Event Hubs
- Azure Service Bus
- Azure Storage
- Azure Container Instances
- Azure Search
The up-to-date list can always be found here: https://github.com/Azure/open-service-broker-azure/tree/master/docs/modules
Have fun with it 🙂

If i want to use an existing database. How can i do for serviceInstance?
LikeLike
Hi Gara, in the documentation here (https://github.com/Azure/open-service-broker-azure/blob/master/docs/modules/mssql.md) there is also a section on how to use OSBA in combination with existing database instances.
That said, I did not try myself yet 🙂
Cheers,
Christian
LikeLike
Hi Christian, I have created a postgresql database with OSBA. How can I update a parameter, for example the number of cores? Thanks
LikeLike
You should be able to just adjust your deployment and simply re-apply it. The service broker should then take care of the rest for you.
LikeLike
This was great to readd
LikeLike